
Super-administrator — initial setup
Provisioning, configuring filières, levels, classes, courses, fees, and staff.
Before you start
This guide is for the super-administrator of an institution that has just been provisioned on KLASSCI. It walks through the order in which to configure the platform so you can start enrolling students for your first academic year.
Plan for 2 to 3 hours of full setup, with the following on hand:
- the list of your filières and their study levels,
- the tuition-fee grid (or at least the enrollment fees),
- the list of administrative and teaching staff with their email addresses,
- optionally, the parent accounts if you enable parent access.
Don't worry about missing something. Everything is editable later. You can perfectly start with one filière and one fee, then enrich week by week.
Step 1: create the current academic year
The academic year is the foundation of the entire platform: enrollments, payments, report cards, and results are all tied to a given year. So it's the very first object to create in a new tenant.
1.1 — Starting point: your dashboard
Once signed in as super-administrator, you land on the dashboard. The academic year shown in the top right (blue badge 2025-2026) is the current year for your institution.

1.2 — Open the Academic Years module
In the left sidebar, expand the Filières & Classes menu (under GESTION ACADÉMIQUE). The submenu lists four entries: Filières, Classes, Niveaux d'études, and Années universitaires.

Click Années universitaires. The page lists every year already created with its status. On a fresh tenant, the table is empty.

In the top right, click the blue + Nouvelle année universitaire button.
1.3 — Fill out the creation form

Fill in the following:
- Nom (required) — the recommended convention is
YYYY-YYYY, for example2025-2026. This label shows up everywhere in the application (report cards, exports, badges). - Description (optional) — useful to distinguish two parallel campaigns or add an internal note.
- Date de rentrée (required) — official first day of the school year (typically early October in Côte d'Ivoire).
- Date de fin (required) — official last day, usually the date of the final jury.
- Année universitaire active — leave it on. An inactive year can no longer be picked for new enrollments (only useful for archiving a past year).
- Définir comme année universitaire en cours — leave it off for now. You'll switch it on at the next step from the dedicated button on the list.
Click Enregistrer l'année. You're redirected to the list, which now contains your new year with the cyan ACTIVE badge.
1.4 — Mark the year as current
In the list, each row exposes a row of actions: eye (view), blue pencil (edit), yellow circle with a check (set as current), red trash (delete).

Click the yellow button on the row of the year you just created. The badge switches from cyan ACTIVE to green ANNÉE EN COURS, and the row turns light green to confirm the change.

That's it. From now on, every new enrollment, payment, and report card is tied to this year by default.
One current year at a time. If you click the yellow button on another year, the previous "current" one automatically falls back to plain ACTIVE. No data is lost: enrollments from the previous year stay tied to their original year.
Worth knowing about enrollments and academic years
In KLASSCI, a class is NOT attached to an academic year — the enrollment is. This means a single class (e.g., BTS Bâtiment 1ère année) can host students from several successive academic years without having to be recreated each fall.
Concretely, when you filter students by class, what separates 2024-2025 from 2025-2026 is the annee_universitaire_id on their enrollment, not the class itself.
Step 2: configure your filières
A filière is a field of study (Building, IT, Communication, Public Works, etc.). It's the filière that study levels (BTS1, L1, M1...) and classes are then attached to.
2.1 — Open the filières list
Still in the Filières & Classes sidebar menu, click Filières (just above Classes). The page lists every existing filière with its code, type, and the count of attached levels and courses.

In the top right, click + Nouvelle Filière.
2.2 — Fill out the form

Fill in:
- Nom de la filière (required) —
BATIMENT,Communication & Marketing,INFORMATIQUE,TRAVAUX PUBLICS. Avoid abbreviations: this is the label that shows up everywhere in the app. - Code (required) — a short, unique code (
BTP,INFO,TP,GES-COM). Used as a technical identifier and as a prefix in some exports. - Description (optional) — a paragraph describing the filière. Shown on the detail page and useful for future student-facing guides.
- Filière active — leave it on. An inactive filière is hidden from enrollment lists but its data stays intact.
2.3 — Edge case: tronc commun
Conditional feature. The tronc-commun section appears in the form only when the tronc_commun_enabled setting is on in the tenant's parameters. On a fresh tenant this setting is off by default — the section and its toggle do not exist, you can skip this sub-step. Turn it on from Settings → Advanced if your offer includes a common-core programme.
If your filière starts with one or more shared semesters before specialising (typically Civil Engineering → Building / Public Works in S2), turn on the Cette filière est un tronc commun toggle in the dedicated section. A Number of common semesters field appears (defaulting to 1).
For specialisation filières that depend on a tronc commun, do the opposite: leave the toggle off, but pick the parent tronc-commun filière in the Filière parent (Tronc Commun) dropdown. So you need to create the tronc commun first, then its specialisations.
Tronc-commun workflow. The student first enrolls in the tronc commun, then in a specialisation at the end of the common semester(s). The report card aggregates tronc-commun grades and specialisation grades for the annual average.
Click Créer la filière. You're redirected to the list, which now contains your new filière with the blue Active badge. Repeat for each of your filières.
Step 3: create the study levels
The study level marks the position in the cursus (BTS first year, BTS second year, Licence 1, Licence 2, Master 1, etc.). This is where the distinction is made between the BTS system (short cycle) and LMD (Licence-Master-Doctorat).
3.1 — Open the levels list
Still under Filières & Classes in the sidebar, click Niveaux d'études. The page shows a mini dashboard with four KPIs (total levels, active levels, total classes, total courses) followed by the full list.

In the top right, click + Nouveau Niveau.
3.2 — Fill out the form

Fill in:
- Nom du niveau (required) — for example
BTS Première AnnéeorLicence 1. This is the short label that appears in pickers and report cards. - Code du niveau (required) — a short, unique code (
BTS1,L1,M2). Should stay stable over time: it's what exports and imports use to find the level. - Type de formation (optional) — seven options:
BTS,Bachelor,Licence,Master,Doctorat,Diplôme,Certificat. Only Licence, Master and Doctorat trigger the LMD system (UE / ECUE / ECTS credits). All others fall back to BTS (plain semesters) —Bachelor,DiplômeandCertificatare not LMD despite their naming. - Année d'étude (optional) — position in the cursus (1st year, 2nd year, 3rd year...). Used to compute the student's academic progression.
- Libellé complet (optional) — the long form, e.g.,
Brevet de Technicien Supérieur - Première Année. Used in some official documents (attestations, formal report cards). - Description (optional) — free-form paragraph for internal detail.
- Niveau actif — leave it ticked. An inactive level disappears from enrollment dropdowns, but existing classes keep working.
Scroll to the bottom of the form and click Créer le niveau.

Repeat for each level in your offer. As an example, here's a typical grid for an institution running both BTS and LMD:
| Training type | Code | Recommended label |
|---|---|---|
| BTS | BTS1 | BTS Première Année |
| BTS | BTS2 | BTS Deuxième Année |
| Licence | L1 | Licence Première Année |
| Licence | L2 | Licence Deuxième Année |
| Licence | L3 | Licence Troisième Année |
| Master | M1 | Master Première Année |
| Master | M2 | Master Deuxième Année |
Don't confuse level and class. A single level (BTS1) can be instantiated as several classes depending on the filière (BTS1 Bâtiment, BTS1 Informatique...). The level is a concept, the class is a group of students. You'll create classes in the next step.
Step 4: create the classes
A class is a group of students who share the same filière, the same study level, and the same academic year. It's the most-used object day to day: enrollments, schedules, grades, attendance, and report cards are all attached to it.
4.1 — Open the Classes page
Still under Filières & Classes in the sidebar, click Classes. The page opens with a wide blue banner that summarizes class status for the current year:
- total active classes,
- total enrolled students across all classes,
- total and used seats,
- overall occupancy rate.

Below the banner you have a search bar, four filters (filière, level, status, capacity), and an Exporter button to generate a CSV. Each class is shown as a card that exposes at a glance its filière, level, enrolled count, and fill rate.
In the top right, two buttons:
- Sync BTS/LMD — recomputes each class's academic system from its study level (Licence / Master / Doctorat → LMD, otherwise BTS). Use it if a class ends up on the wrong cycle after a manual level change or a data migration.
- + Nouvelle classe — opens the creation modal.
4.2 — Fill out the creation modal
Click + Nouvelle classe. A modal form opens over the list without reloading the page.

Fill in:
- Nom de la classe (required) — for example
1ère année BTS Génie Civil Option Bâtiment. This is the label that shows up in class lists, report cards, and imports/exports. - Code (required) — a short code unique within the year (
1BTS-GC-BAT,B2-COM,INFO-BTS-1A). Used as a stable technical identifier. - Filière (required) — pick from the list created in step 2.
- Niveau d'études (required) — pick from the list created in step 3.
- Année universitaire (required) — pre-filled with the current year but editable, useful to prepare next year's intake in advance.
- Système académique — not editable. Determined automatically from the study level (Licence/Master/Doctorat level → LMD; otherwise BTS).
- Capacité maximale (required) — defaults to 30. This is the upper bound shown on the class card and used to compute the fill rate. Strict blocking of new enrollments once the capacity is reached is a UI feature still being finalised; in the meantime KLASSCI lets you go over but flags the class as full.
- Classe active — leave it on. An inactive class disappears from enrollment pickers but keeps all its data.
- Description (optional) — a free-form paragraph to spell out context (option, special mention, access restriction...).
Click Enregistrer la classe. The modal closes and the grid refreshes immediately with your new card.
4.3 — The action menu on each card
On each card, the three-dot button in the top right opens a contextual menu.

The available actions:
- Gérer les matières — assigns courses (BTS) or UE/ECUE (LMD) to the class with their coefficients and hours volume. You'll come back to this in step 5.
- Liste d'appel — opens the attendance sheet for the most recent session.
- Liste complète — exports the list of enrolled students with their administrative info.
- Modifier — re-opens the modal from step 4.2 to adjust name, capacity, description, etc.
- Archivage — moves the class to the archive folder at end-of-year. The button is disabled while the class is tied to a current year.
One class per (filière, level, parallel) triplet. If you have two parallel groups of the same level (e.g., BTS1 Bâtiment Groupe A and BTS1 Bâtiment Groupe B), create two distinct classes. That way you can manage their schedules, grades, and capacity independently.
Step 5: configure the courses
A course is a teaching unit (Mathematics, English, Algorithmics, Digital Marketing...). In KLASSCI, each course lives in a central catalogue and is then linked to one or more (filière × level) pairs — what we call a link. So the same course can be taught across several filières at different intensities.
5.1 — Open the Courses module
In the sidebar, locate the ENSEIGNEMENT section and click Matières.

The page opens with a blue stats banner (total courses, active, with links, total hours) followed by the full catalogue.

Each row shows the code, name, default coefficient, hours volume, the count of links (badges like BTP 1A, BH123 LIN456 that mark a filière × level pair), and the status. The filter bar (filière, level, status) makes lookup easy once the catalogue grows past a dozen entries.
In the top right, click + Nouvelle matière.
5.2 — Identify the course
The form is split into two columns: identity on the left, the big link picker on the right.

Fill in the Identité de la matière column:
- Code de la matière (optional) — leave it blank to have it auto-generated from the name (
MATH,ALG,MKT-DIG). You can also force your own if you have an internal convention. - Nom complet (required) — for example
Mathématiques appliquées,Algorithmique,Marketing digital. This is the label that shows up everywhere. - Type de formation (required) — two options:
Formation générale(default) orFormation technologique et professionnelle. Used for internal classification and some catalogue filters. - Couleur de la matière (color picker) — used to represent the course on the schedule. Pick a color that's easy to tell apart from the other courses at the same level.
- Description (optional) — free text to spell out the syllabus or the history.
- Matière active — leave it on. An inactive course disappears from upcoming schedules and assessments, but past grades stay intact.
5.3 — Pick the links (filière × level)
This is the heart of the system. In the Liaisons Filières & Niveaux column, each card represents a filière (BATIMENT, Communication & Marketing, Gestion Commerciale, Travaux Publics, Informatique...) and lists every study level as checkboxes.
Click the levels where the course should be taught. Each click activates the link and increments the "n sélection" counter in the top right. The Tout sélectionner button on a card ticks every level of that filière at once (useful for a transversal course like English or Mathematics).
Coefficient and hours volume per link. The coefficient and the hours volume (CM / TD / TP) for each (filière, level) pair can be tuned separately after the course is created, from the detail page (eye icon in the list). This mechanism is what lets the same Mathematics carry coefficient 3 in BATIMENT and 4 in TRAVAUX PUBLICS, without duplicating the course.
Click Enregistrer la matière. You're redirected to the list, where the new entry shows up with its link badges.
5.4 — LMD system: structuring with UE and ECUE
For Licence / Master / Doctorat levels, the course form in step 5.2 isn't enough on its own. The LMD system enforces a two-tier hierarchy: an UE (Unité d'Enseignement, teaching unit) groups several ECUE (Éléments Constitutifs d'Unité d'Enseignement — the actual courses students attend), with a per-UE total of ECTS credits.
This structure lives in the SYSTÈME LMD section of the sidebar.

Prerequisite: Domaines & Parcours. Before you can attach a UE to a curriculum, you need at least one parcours (academic track / programme) created in LMD → Domaines & Parcours (e.g., Licence Marketing & Communication, Master Génie Civil). Without a parcours, step 5.4.3 has nothing to link against. If your institution has only configured BTS so far (steps 1 through 5.3), this is where the LMD setup begins.
5.4.1 — Create a UE
In the sidebar, click Unités d'Enseignement under LMD.

The blue banner summarises the LMD catalogue (UE count, attached ECUEs, total ECTS credits distributed). Top right, + Nouvelle UE routes you to the full creation form (a dedicated page, not a modal even though the visual rendering uses a centered card style).

The form covers the UE identity (intitulé, code, credits, type, description) and its initial link to a curriculum (parcours, filière, level, semester, order, coefficient) — all on the same screen. Fill in:
- Intitulé (required) — for example
Technologie de construction,Mathématiques fondamentales. This is the label that appears on the report card. - Code (required) — a short code unique within the parcours (
UE:BTCB1,UE-MATH01). - Credits (required) — total credits this UE is worth (typically between 1 and 30). It will be split across the ECUEs.
- Type UE (required) — four options:
Fondamentale,Méthodologique,Découverte,Transversale. The type doesn't change calculations, just the visual classification. - Parcours, Filière, Niveau, Semestre, Ordre, Coefficient (required depending on context) — the initial curriculum link is set right on this page. You can always link the UE to additional parcours later (step 5.4.3).
- Description (optional) — free text.
Click Enregistrer. The UE shows up in the list with 0 ECUE and its first parcours link already active.
5.4.2 — Add ECUEs to the UE
Two paths depending on timing:
- Inline while creating the UE — an ECUE table on the same UE creation page lets you add ECUEs straight away. Handy for a quick setup when you already know the ECUEs at UE creation time.
- From the UE list after creation — each UE row exposes an action bar with a dedicated button to add an ECUE. The screenshots below document this second path.

Buttons on the row, left to right: green add an ECUE, route indigo link the UE to parcours, edit the UE, delete. (To expand the list of ECUEs already attached, click the UE row itself — the ▶ arrow on the left is a visual cue, not a button.)
Click the green button to open the ECUE add form.

At the top, the Crédits de l'UE 0 / 3 gauge fills up as you add ECUEs — at a glance you can tell whether the UE total has been reached (3 credits in this case).
Two tabs:
- + Créer un ECUE — creates a brand-new ECUE. Fields:
- Nom (
Résistance des Matériaux,Mécanique appliquée) - Code (
RDM101,MEC-A2) - Coefficient (default 1) — weight of the ECUE in the UE's average.
- Crédits (default 2) — share of the UE's credits assigned to this ECUE. The credits of every ECUE in the UE must add up to the UE total.
- Ordre (default 0) — display order on the report card.
- Nom (
- Lier un existant — reuses an ECUE already created in another UE (the same ECUE can belong to several UEs with different values).
Values are scoped to this UE. The coefficient and credits set here apply only in this UE. If you later link the same ECUE to another UE, you can give it different values without affecting the first link.
Click Créer l'ECUE (green button). The ECUE is attached to the UE and the credit gauge increases. Repeat until the UE total is reached.
5.4.3 — Link the UE to one or more parcours
A UE can be taught in several parcours and several semesters beyond its initial link (step 5.4.1). To add or adjust those links, on the UE row click the indigo route button (itinerary icon, not a chain).

Tick the parcours where the UE should appear, then click the relevant semesters on each row. Click Enregistrer.
All ECUEs follow automatically. When you link a UE to a parcours, every ECUE inside it becomes available in that parcours. No need to repeat the link for each ECUE.
If the modal shows "Aucun parcours trouvé" as in the screenshot, no parcours have been created yet. Head to LMD → Domaines & Parcours to create one, then come back to the UE list to make the link.
If your institution only runs BTS, you can ignore the SYSTÈME LMD section of the sidebar entirely. The course catalogue (steps 5.1 through 5.3) is all you need.
Step 6: configure fees
Financial setup happens in the Comptabilité module. The full details (categories, per-class amounts using the MESRS standard, optional services and assignments) live in the dedicated module page:
The minimum to set up before starting enrollments:
- Create the mandatory categories (at least
Frais d'inscriptionandFrais de scolarité) with a default amount. - Configure per-class amounts for classes expecting enrolments next year (only if rates differ from the default).
- Optional: create the optional services (cantine, transport) with their formulas and assignments.
Once done, the accounting team takes over for the day-to-day via Bursar — operations (payments, reminders, exports).
Step 7: create staff accounts
The Personnel module centralises administrative and faculty accounts. KLASSCI ships two flavours of form: a single-page form for administrative roles (Coordinator, Registrar, Bursar, Cashier) and a 4-step wizard for Faculty (academic fields + documents).
7.1 — Open Personnel management
Sidebar → ADMINISTRATION → Personnel → Gestion du personnel.

The page shows a stats banner per role (Coordinators, Faculty, Registrars, Bursars, Cashiers) and 5 matching tabs. A + Nouveau Personnel button in the top right opens a dropdown to pick which role to create.
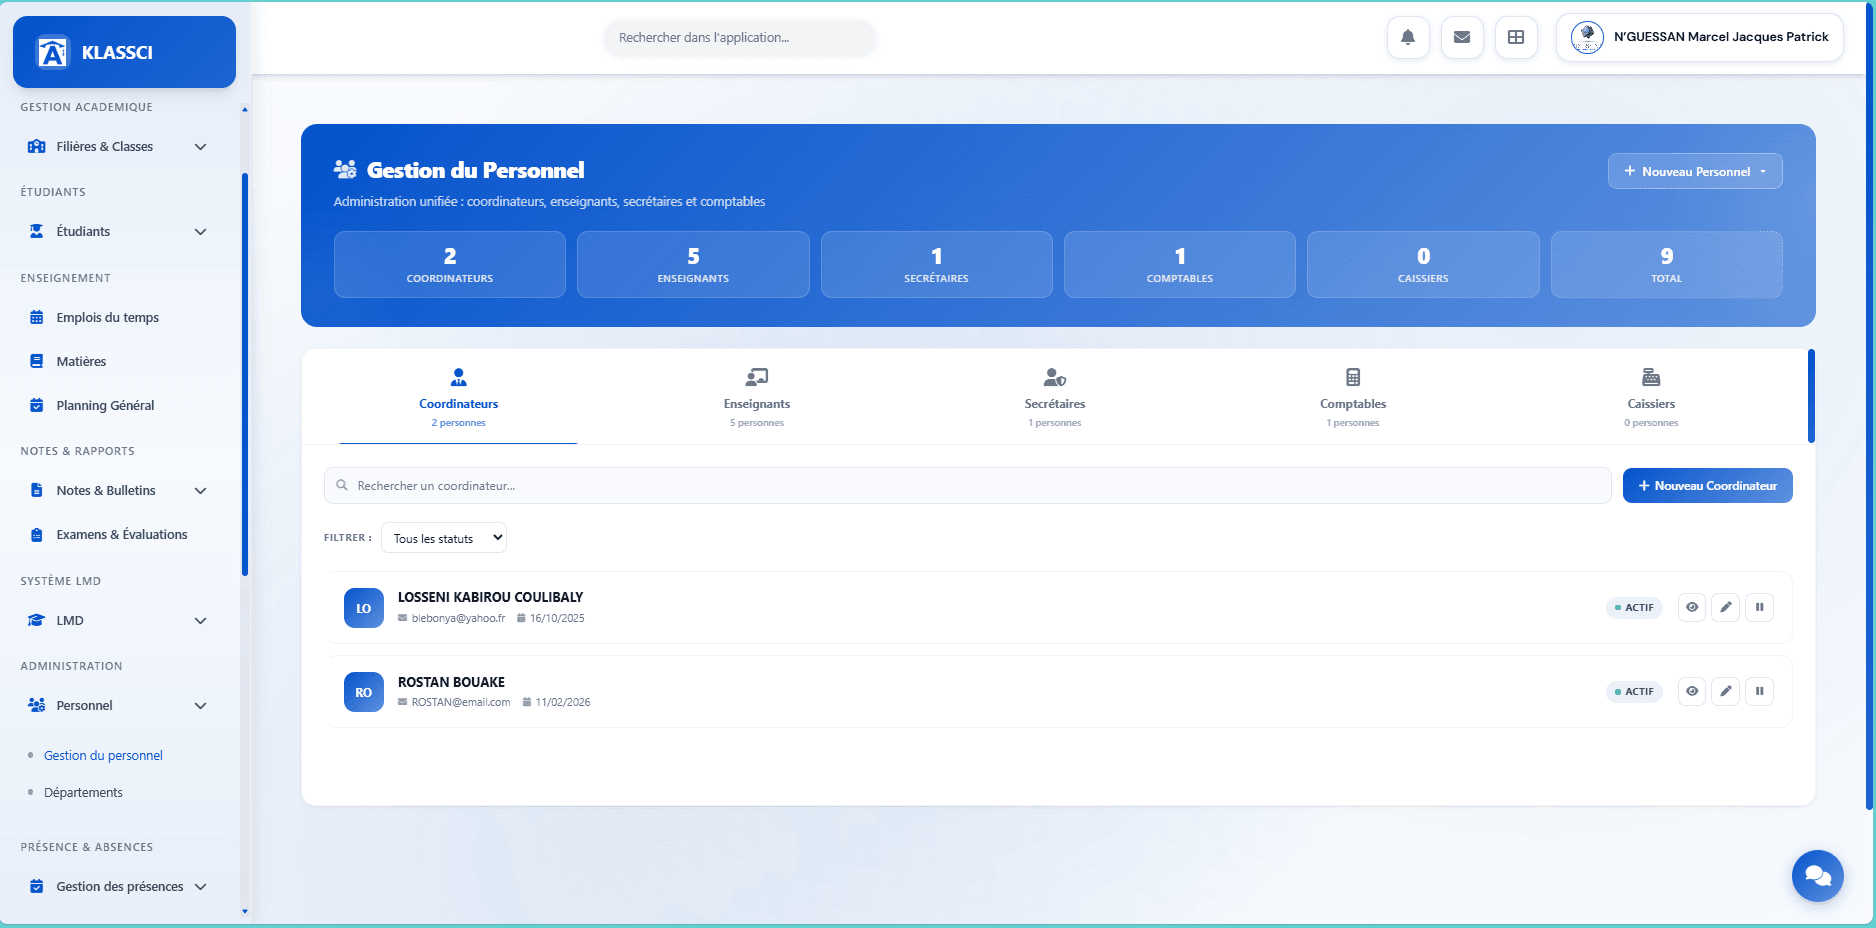
7.2 — Create an administrative role (Coordinator, Registrar, Bursar, Cashier)
Click + Nouveau Personnel → Coordinateur (or Secrétaire, Comptable, Caissier). The form is on a single page.
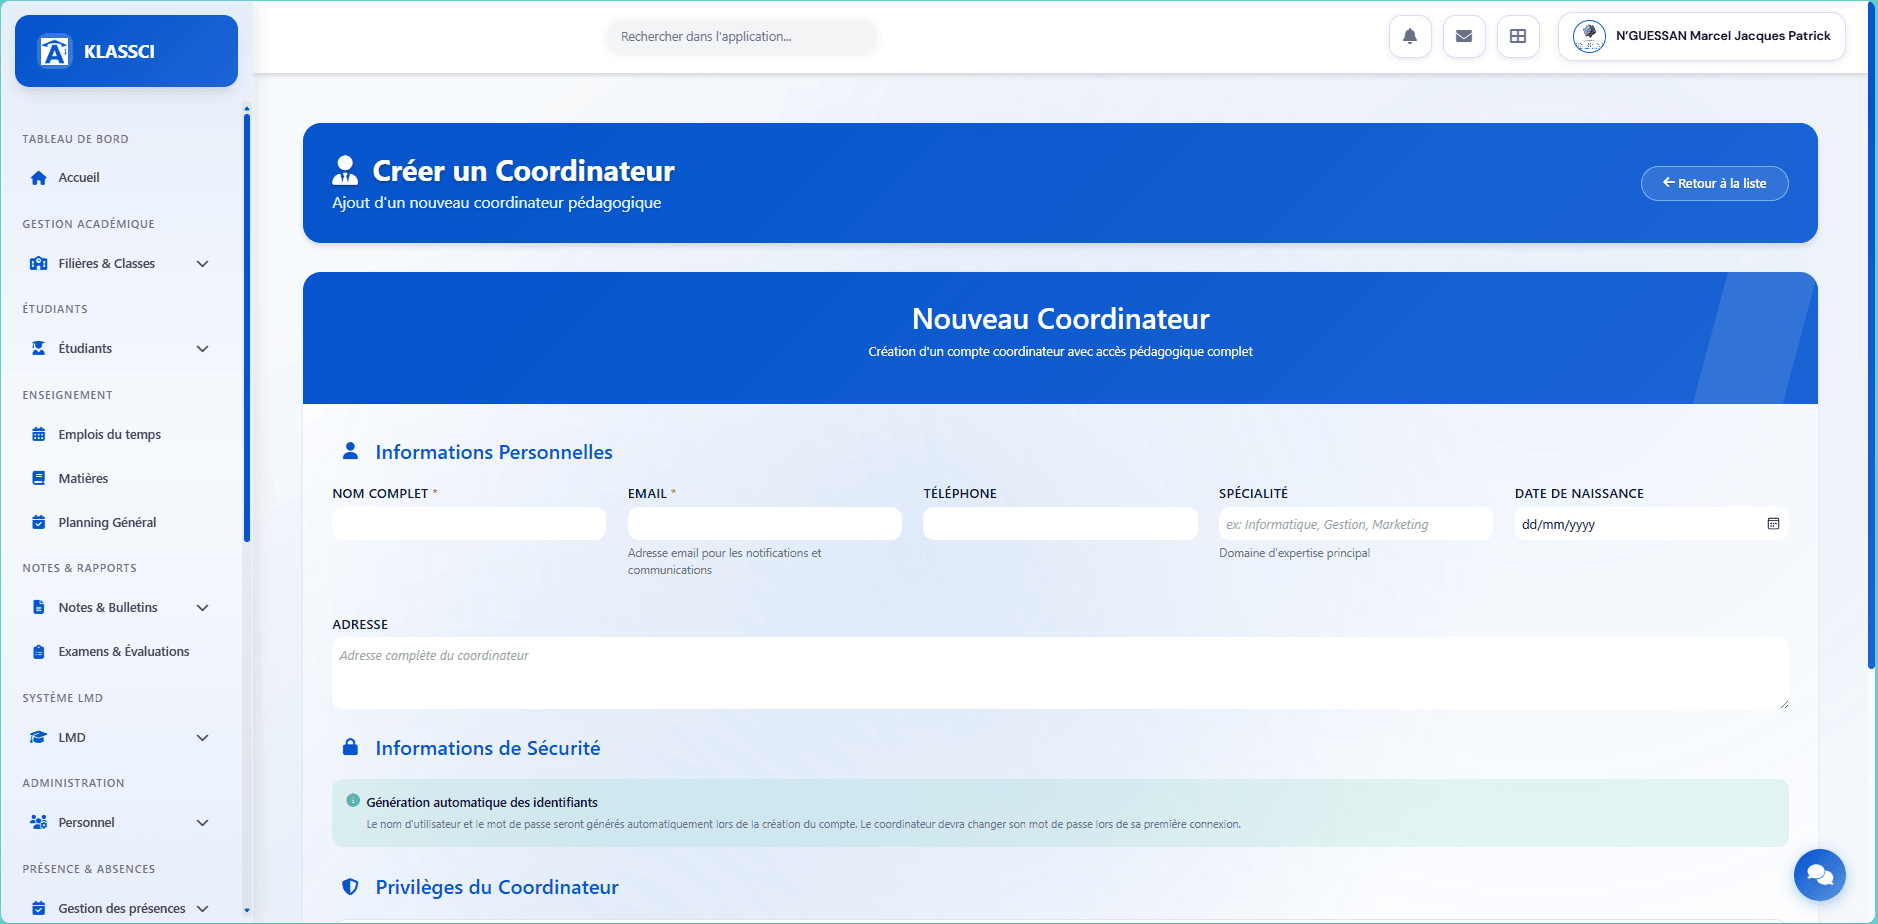
Four sections:
- Informations personnelles — Nom complet (required), Email (required), Téléphone, Spécialité, Date de naissance.
- Adresse — free text.
- Informations de Sécurité — info banner: the username and initial password will be auto-generated on submit.
- Privilèges du Coordinateur — read-only list of features the role will have access to. The list changes per role (Bursar sees financial privileges, Registrar sees enrollment privileges, etc.).
Click Créer le Coordinateur.
Registrar / Bursar / Cashier follow the exact same form — only the privileges list at the bottom changes. The + Nouveau Personnel button in the header offers each role in its dropdown menu.
7.3 — Create a Faculty member (4-step wizard)
The faculty form is richer because it carries academic fields used by the grades, schedule, and report-card modules. Click + Nouveau Personnel → Enseignant: a 4-step wizard opens.
Step 1/4 — Personal information
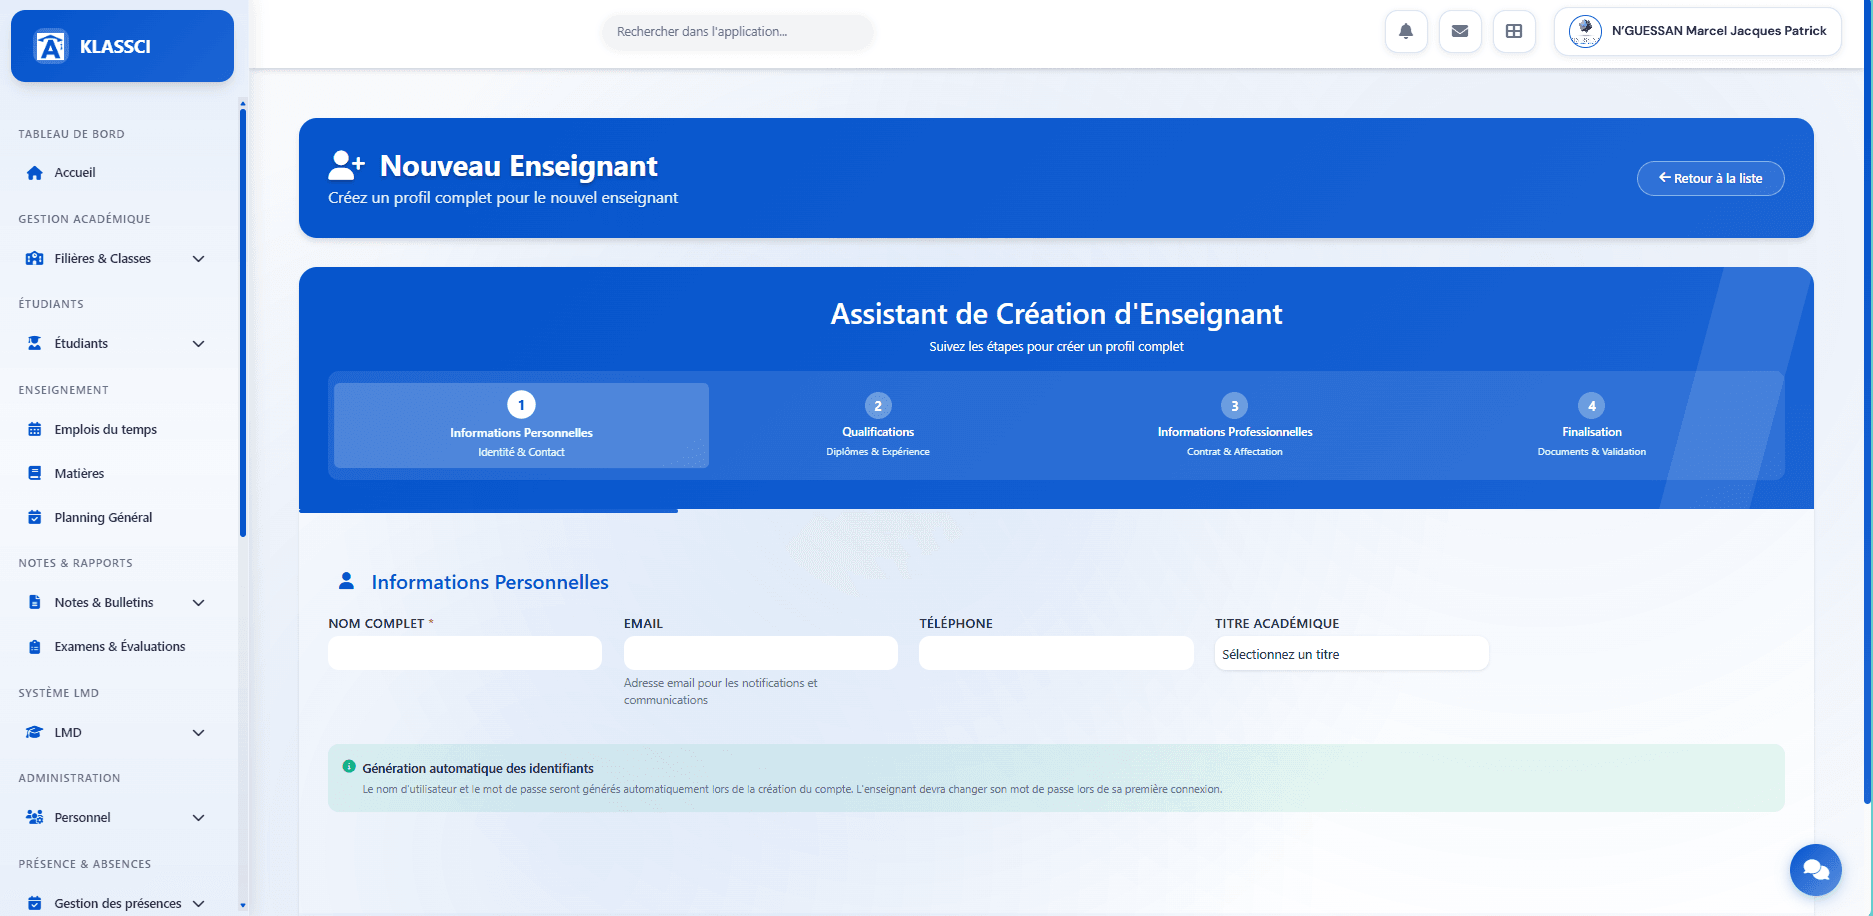
Nom complet (required), Email, Téléphone, Titre académique (Pr., Dr., M., Mme…). Click Suivant.
Step 2/4 — Qualifications & Experience
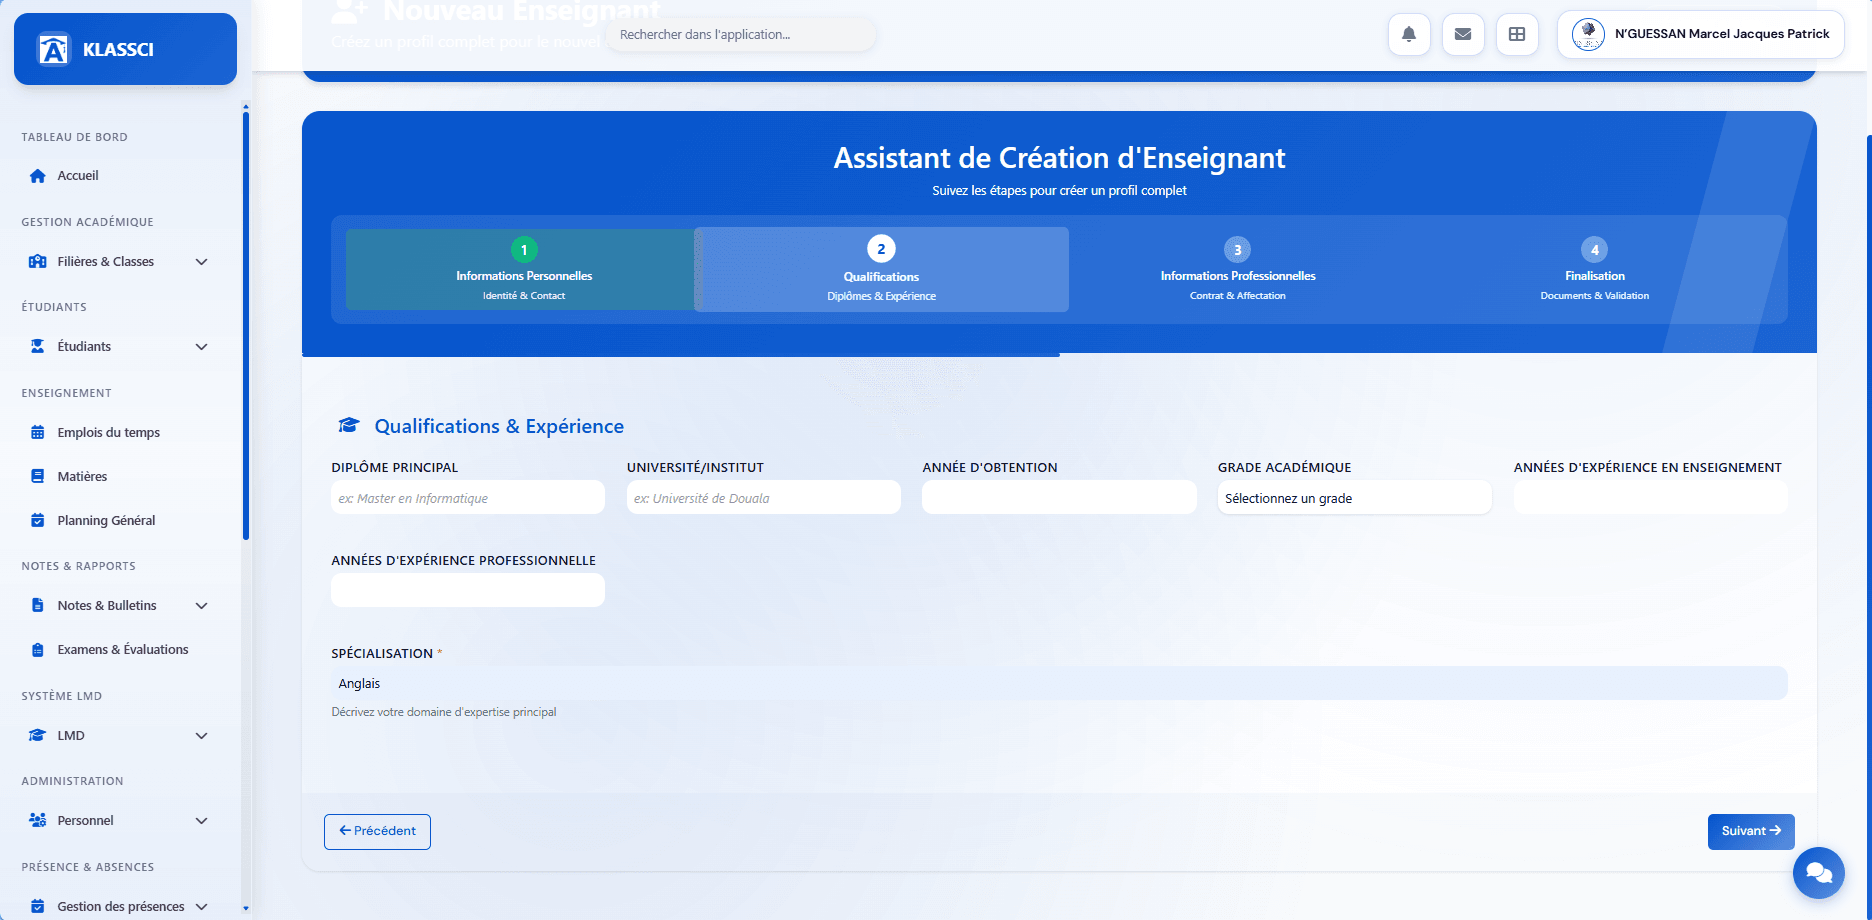
Main diploma, University/Institute, Year obtained, Academic grade, Years of teaching and professional experience, Specialisation (required) — this last field determines which courses can be assigned.
Step 3/4 — Professional information
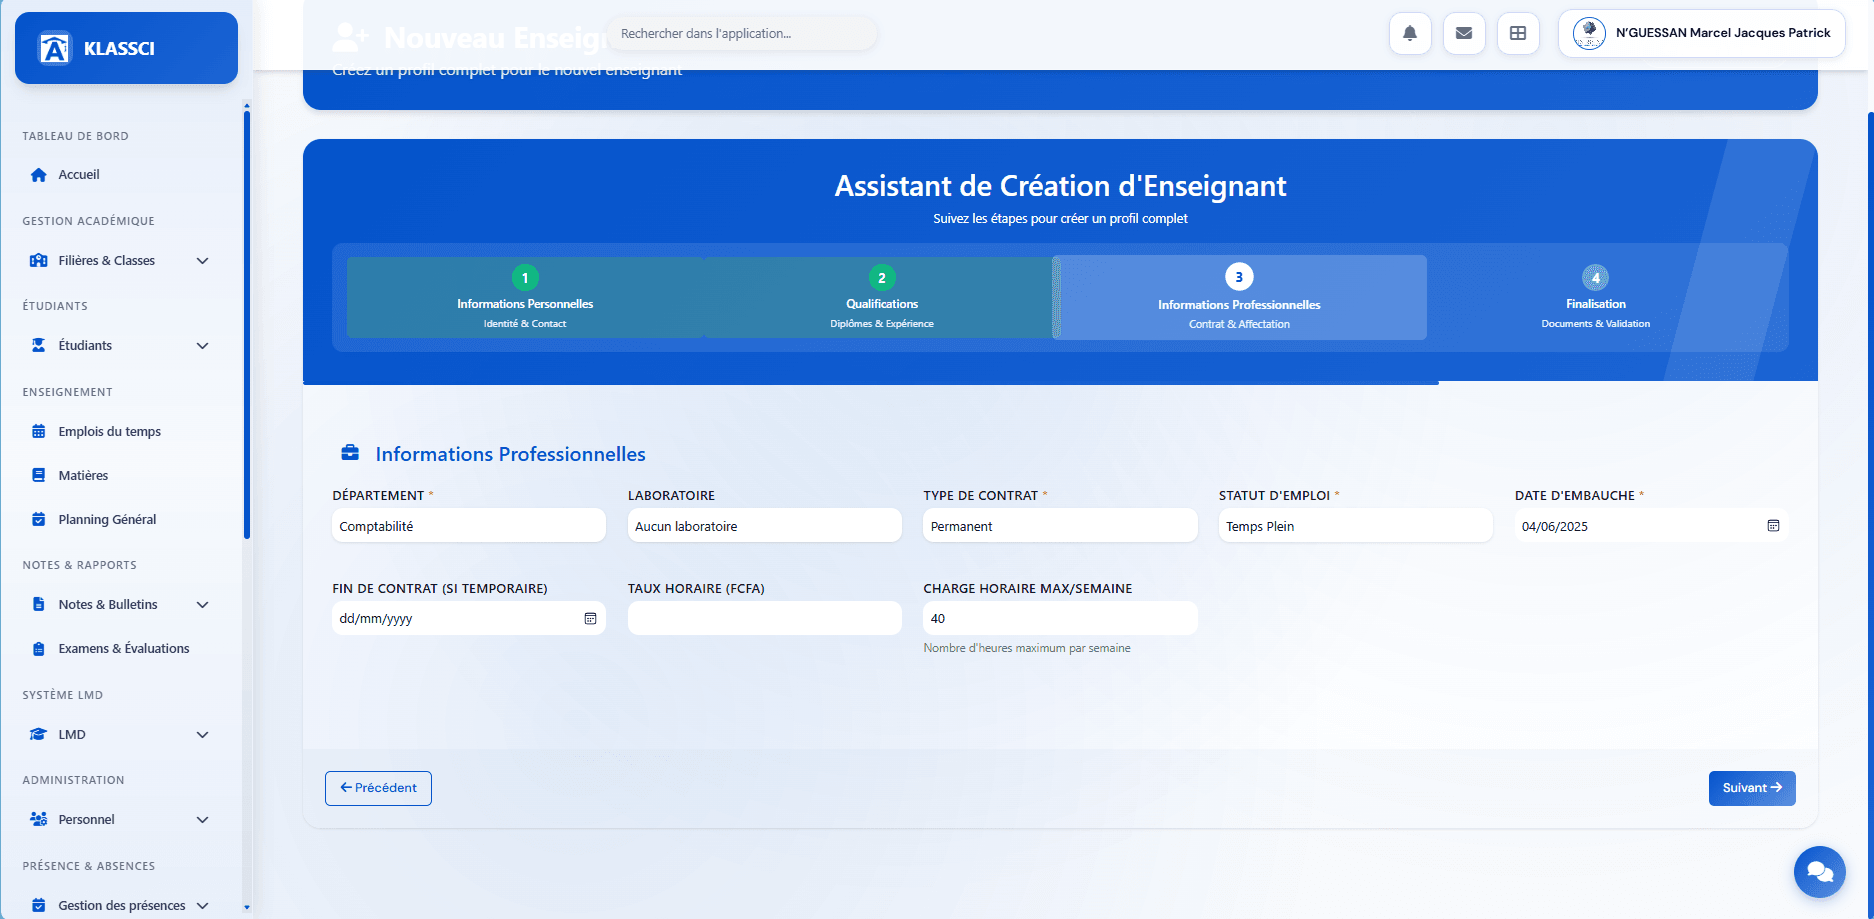
Department, Laboratory, Contract type (Permanent / Temporaire), Employment status (Temps Plein / Temps Partiel), Hire date, Contract end (if temporary), Hourly rate, Max weekly load (used by the schedule module to cap assignments).
Step 4/4 — Finalisation
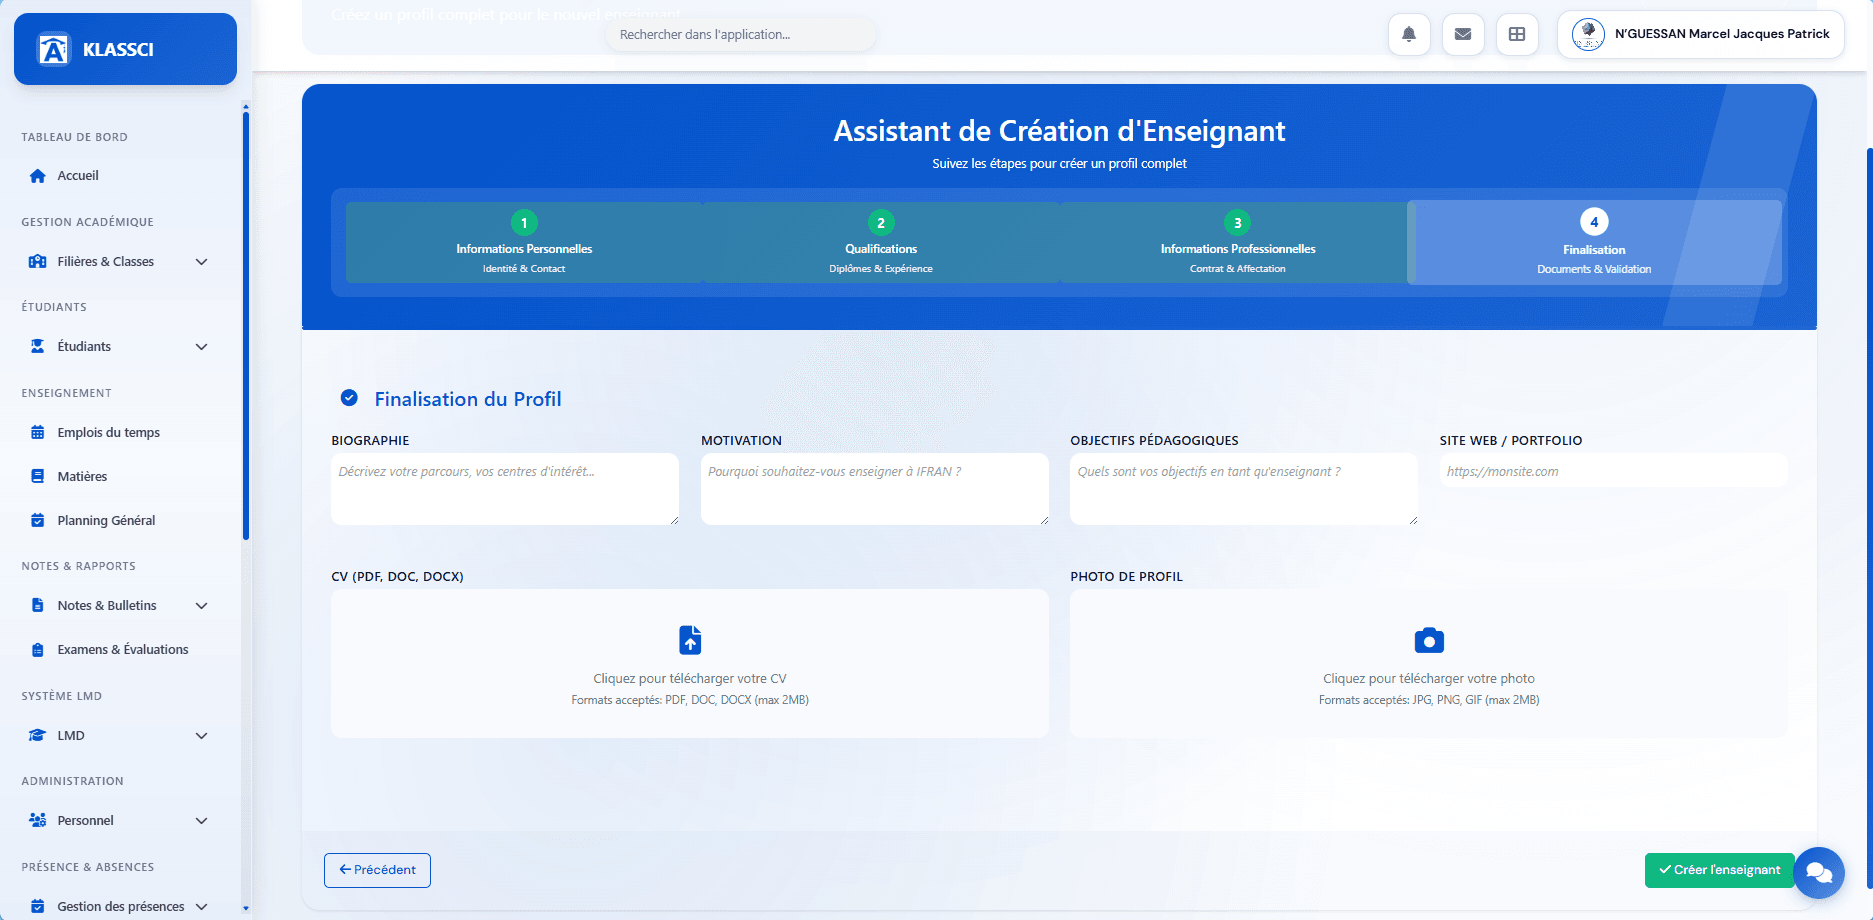
Biography, Motivation, Pedagogical objectives, Website/portfolio, CV (PDF/DOC/DOCX max 2 MB), Profile photo (JPG/PNG/GIF max 2 MB). All fields are optional — you can submit the faculty member without filling anything in here, and they'll complete it from their own space.
Click Créer l'enseignant.
7.4 — Auto-generated credentials
On submit (simple role or faculty), a Compte créé avec succès modal opens with the credentials ready to share.

The username uses a per-role prefix: coord. (Coordinator), prof. (Faculty), sec. (Registrar), compta. (Bursar), caisse. (Cashier). Final format: prefix.firstname.lastname, with auto-deduplication (.1, .2…) on collision. The temporary password is secure and shown in clear once — use the Imprimer button or the copy button to share it with the member. For faculty, a Voir la fiche button leads straight to the detail card to configure availability.
On first sign-in, the member is forced to change their password. Passwords expire after 6 months with a 1-month advance warning — adjustable by the super-administrator via the tenant setting password_expiry_months.
Watch the faculty permissions. If you enable the notes_evaluations, presences, and emploi_temps modules at the tenant level, remember to grant them to the enseignant role in Spatie Permission too. Otherwise, faculty members will see an empty sidebar. Toggling the module isn't enough — the business permission has to be granted as well.
Step 8: dry run before going live
This step isn't testing KLASSCI — it's testing your configuration. You've just entered dozens of filières, levels, classes, MESRS amounts, and per-role permissions. A forgotten default amount, a missing faculty permission, or a class with no fees configured can affect hundreds of real enrollments at the start of the year. Twenty minutes of validation with a test student catches what would otherwise hit 200 student records.
Procedure (~20 min)
- Verify the super-admin sidebar — signed in at
https://your-school.klassci.com, every module activated at the tenant level should appear. A missing entry means a module disabled by mistake or an incomplete permission. - Create a test student —
Étudiants → Nouvel étudiant. Enroll them in a class. Confirm the class accepts the enrollment (capacity not full, current academic year, active filière). - Verify the financial standing — the test student's record should display exactly the mandatory fees of the class, with the 3 MESRS amounts when applicable. If it's empty or shows
0 FCFA, your fee matrix is incomplete for that class. - Test grade entry on the faculty side — sign in as a test faculty account, open the class, confirm grade entry is accessible. An empty sidebar on faculty = missing permissions for the role (see step 7 callout).
- Test activation email delivery — re-run a test personnel account creation. The activation email should arrive. If not, check the tenant's SMTP config.
- Clean up — delete the test student and the test personnel account once validation passes.
If all 5 checks pass, your tenant is production-ready. Send the URL and credentials to your administrative team and start enrolling real students.
Why this dry run. Every KLASSCI tenant runs on its own Laravel instance, its own MySQL database, and its own config (SMTP, storage, payments). The application core is battle-tested in production on other institutions, but your specific instance has its own context. One hour of controlled validation beats a chaotic start of the year. It's a SaaS standard — Stripe, Salesforce, Shopify all impose an equivalent go-live checklist.
What's next
- For day-to-day enrollment management, read the Registrar — managing enrollments guide.
- To understand the enrollment statuses and validation workflow, the same guide goes into detail.
- For anything else, the support team replies within 24 business hours at contact@klassci.com.
Welcome to KLASSCI.