
Registrar — creating a new enrollment
From form to final validation — the full path that turns a prospect into an active KLASSCI student.
A KLASSCI enrollment moves through three phases:
- Capture the enrollment record (student, class, MESRS status, parents, fees).
- Validate in two steps: associate a validated payment, then confirm the final validation.
- Issue the official documents (proof of enrollment, attendance certificate).
This page walks through the three phases in the order you meet them on screen.
Where to start
In the sidebar, expand Students and click New Enrollment.

The screen opens onto a five-section form. The numbered rail (1 to 5) on the right shows your progress.
1 — Personal information
Civil identity of the student: surname, given name(s), gender, date and place of birth, nationality, phone, city, district.

Email and photo are optional. The email is used to deliver login credentials once the enrollment is validated — without one, KLASSCI shows the credentials in a printable modal at validation time.
Matricule. Entered manually. Before saving, click Verify: KLASSCI calls the API and shows an inline badge « Matricule available » or « Matricule already in use ». If your school uses a dedicated convention (for example MESBTP25-0001), keep to it — it makes exports and accounting imports much smoother.
2 — Academic information (class selection)
The full academic assignment flows from the class. The track, study level, and academic year are inferred automatically.

Click the blue Select button. A modal lists every class open for the current academic year.

Three columns help you choose: CLASS, TRACK, LEVEL. The SEATS column shows the enrolled / capacity ratio with a colour cue:
- Green — plenty of seats left
- Orange — capacity nearly reached
- Red — class full
Filter by track (top-left combo) or search by class / track / level name (top-right field). Click Select on the right row — the modal closes and the class is bound to the enrollment.
The Academic year field is pre-filled with the tenant's current year. You can change it for retroactive or anticipated enrollments.
3 — MESRS enrollment status
The government enrollment status decides which amounts get billed.

Three options:
- Affecté — the student was assigned to this track by MESRS. The State covers part of the fees; the student only pays the configured student share.
- Réaffecté — the student was redirected by MESRS from another track. Same or close pricing as Affecté, depending on your matrix.
- Non affecté — private student, no MESRS coverage. Pays the full private rate.
The right-hand panel summarises the financial impact as soon as you pick. For the full matrix, see Fees & accounting — MESRS matrix.
4 — Parents / Guardians (optional)
Collapsible section. An enrollment can have zero, one, or several parents/guardians attached.

Per parent: surname, given name(s), phone (all three become required if the section is filled), then email, profession, relationship (Father / Mother / Guardian / Other), and address are optional.
Pick an existing parent. If the parent is already in KLASSCI for a sibling, tick Select an existing parent at the top of the parent card. A dropdown (with built-in keyboard search) lists every saved parent in the format Surname Given names - Phone. Click the one to attach — no duplicate contact gets created.
The + Add another parent / guardian button opens a second identical card. The red Remove button drops a parent.
No separate « parent » role in KLASSCI. In Côte d'Ivoire, parents in practice use their child's account to follow the schooling. Parental information is kept for contact purposes (reminders, emergencies) but does not create a user account.
5 — Enrollment fees and options
This section becomes active as soon as a class is selected.
Mandatory fees
Auto-checked based on class, track and MESRS status. The amount used is:
- The MESRS variant configured for this class (Affecté / Réaffecté / Non affecté), if it exists.
- Otherwise, the default amount of the fee category (entered when the category was created).

The orange Configuration incomplete banner shows up when a MESRS variant is missing for this class. The default amount is applied — the enrollment is never blocked. The Quick configuration link jumps you straight into the fee grid to fill the gap.
Optional fees
Not checked by default. The student (or parent) explicitly opts in.

Click Subscribe on the row. For multi-formula services (canteen with Full meal, Main course, etc.), pick the formula — the running total updates automatically.

The green Subscribed chip confirms it. The red cross cancels the subscription before saving.
The selected fees summary at the bottom of the section keeps the running total in sight.
Finally click Save enrollment.
The enrollment record
The enrollment is created but not yet validated. Status shown: Pending / step Prospect.

Three main zones make up the record.
Identity and academic
The left column repeats the civil information. The right column summarises the academic assignment: track, level, class, academic year, MESRS status, enrollment date, type (First enrollment / Re-enrollment).
Financial situation
Three KPIs: Total expected / Total paid (validated only) / Remaining balance, with a progress bar.

The Detail by fee table lists each category with its type (Mandatory / Optional), expected amount, paid amount, balance, and settlement status. The Pay button on each row opens the payment modal directly scoped to that category.
Available optional fees & linked payments

The Available Optional Fees zone lists services that were not subscribed at creation — you can still subscribe the student here (handy when the decision is made after the enrollment interview). Click + Subscribe or Subscribe student on the card.
The Payments linked to this enrollment zone is empty until at least one payment has been associated.
Action bar
The blue bar at the top of the record holds the main actions.

| Button | Effect |
|---|---|
| Administration | Opens the Enrollment Administration page — central management of pending enrollments: validate (one-by-one or in bulk), associate or validate a payment, cancel. Filters by track, level, workflow step, and payment presence. See further down. |
| Validate with payment | Visible only while no payment has been associated yet. Opens the payment association modal (with the « validate the payment immediately » option). Does not automatically chain into final validation — you still have to click Validate afterwards. |
| Validate | Final validation — flips the enrollment to Active. Requires at least one validated payment on the enrollment, otherwise KLASSCI returns No validated payment found on this enrollment. |
| Edit | Back to the edit form. Stays accessible before and after activation. For a super-administrator, every field stays editable. For other authorised profiles (registrar, accountant, coordinator), track, level and class are frozen after activation — everything else stays editable. See Edit or transfer a student. |
| Student record | Full student record view. Sparsely populated until grades, attendance or a report card have been recorded for the current year — that has nothing to do with the validation status. |
| Back | Returns to the students list. |
Final validation is the pivot step. Until it has happened, the student does not appear in any class list: no way to record their attendance, enter their grades, or generate their report card. The user account may already exist (created when the full form was submitted) or not (specific case of the cashier pre-enrollment), but without final validation the student is not counted in the headcount nor visible to teachers day-to-day. That validation is what brings them into the active system.
Validate the enrollment
Validation flips the enrollment to Active and brings the student into the headcount. It runs in two distinct steps: associate a validated payment, then trigger the final validation.
Without a validated payment, KLASSCI refuses the final validation. The Validate button returns « No validated payment found ». For a scholarship student or someone paying at term start, see Scholarship student or deferred payment.
Step 1 — Associate a first payment
Click Validate with payment in the action bar (visible while no payment is linked to the enrollment yet). The payment association modal opens.
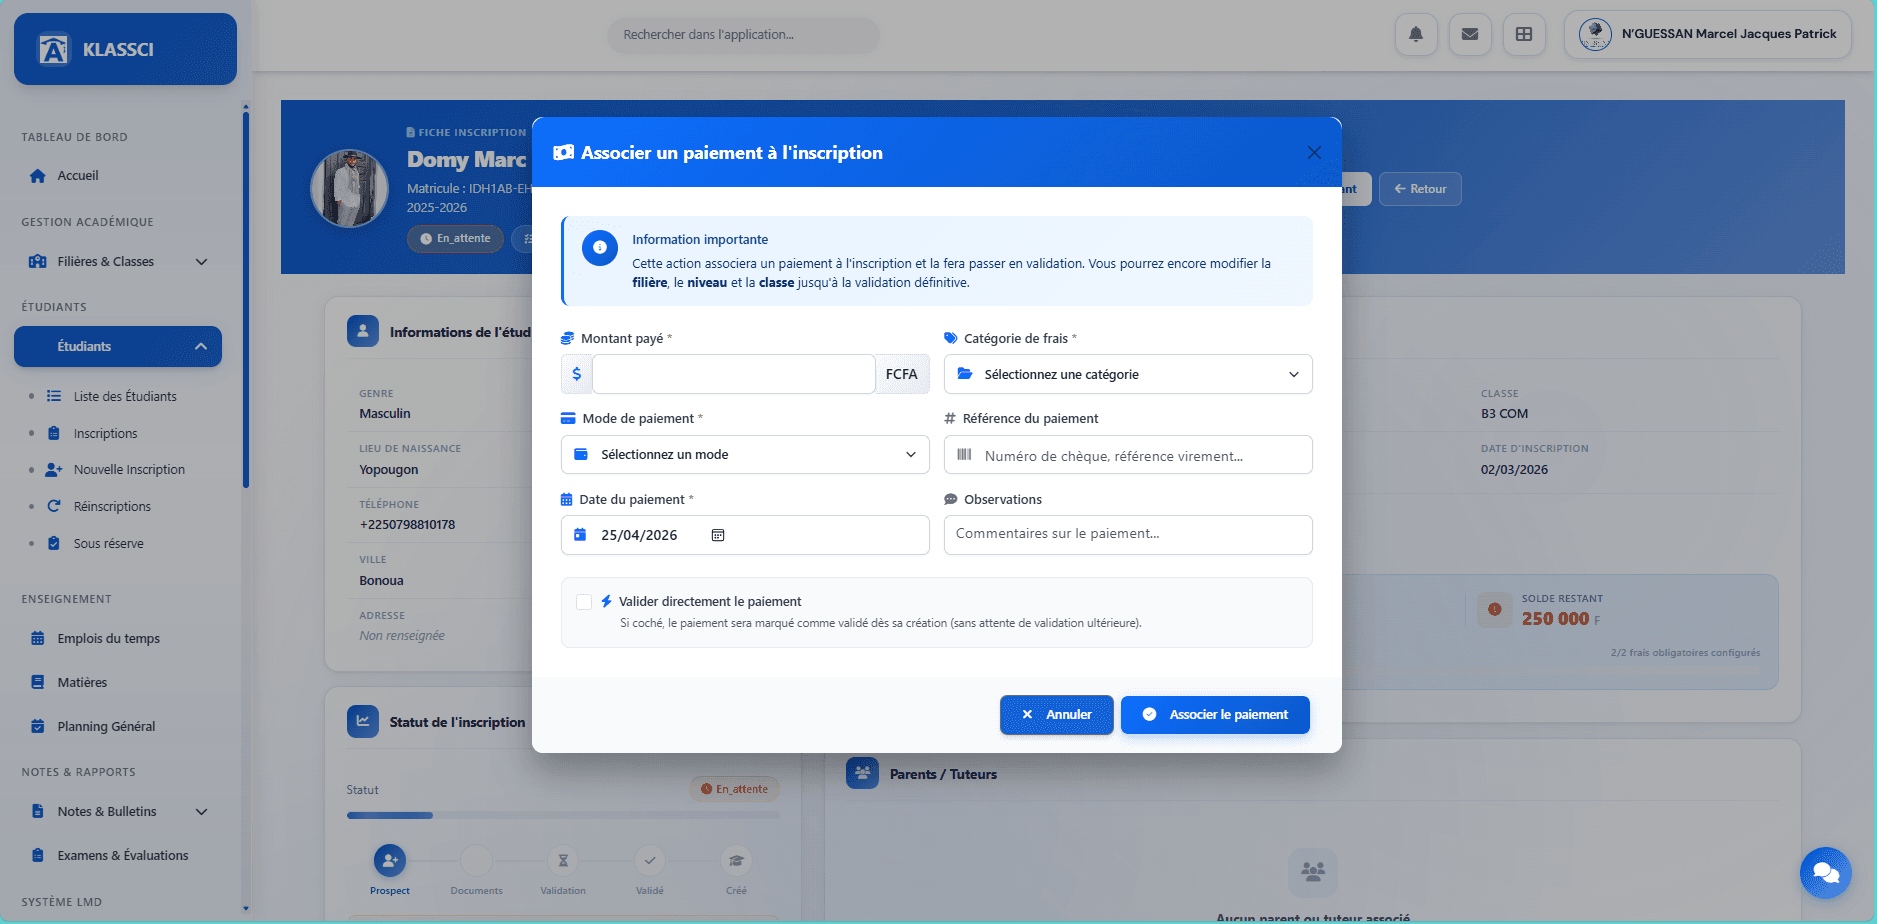
Required fields:
- Amount paid (FCFA) — partial payments are fine.
- Fee category — combo showing the mandatory fees on this enrollment. Once a category is picked, KLASSCI shows the Maximum allowed amount so you do not over-collect by accident.
- Payment method — four options: Cash, Cheque, Bank transfer, or Mobile Money (Wave / Orange Money / MTN MoMo are grouped under Mobile Money — record the operator in the Payment reference field).
- Payment date — pre-filled with today.
- Payment reference (optional) — cheque number, Wave / OM / MoMo transaction ID, transfer reference.
- Notes (optional) — free comment kept in the history.
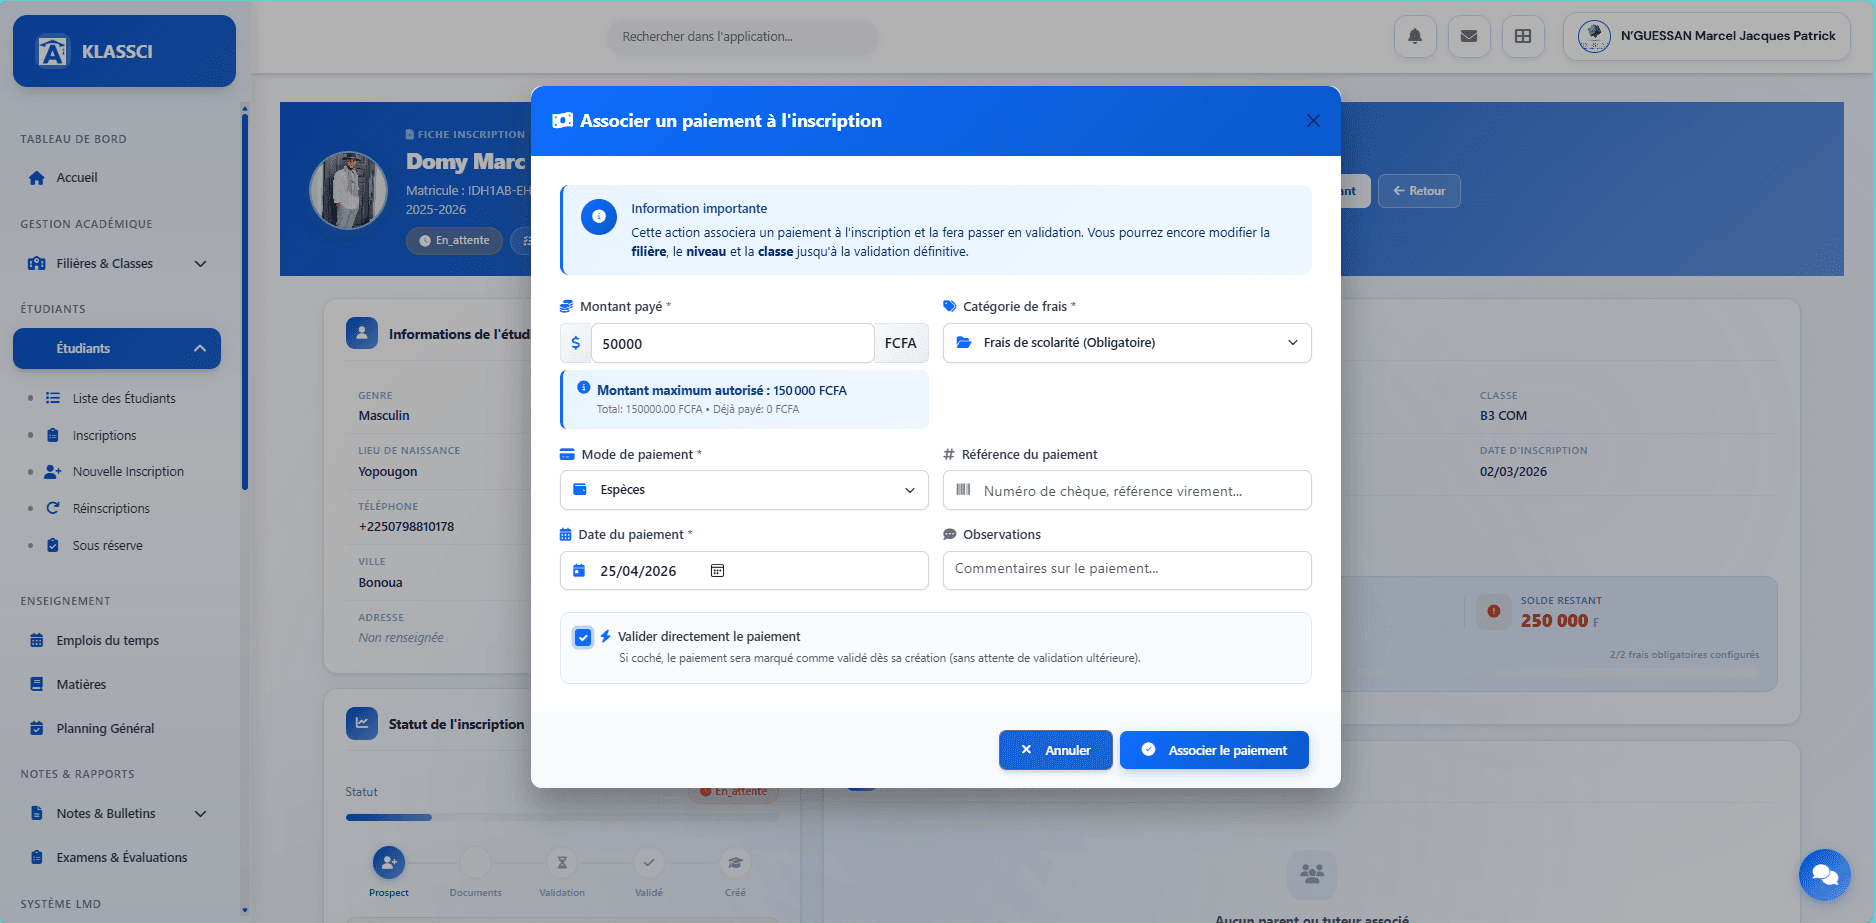
The Validate the payment immediately checkbox:
- Checked — the payment is recorded as validated right away. That is what you want 99 % of the time.
- Unchecked — the payment goes into Pending validation. Accounting must validate it manually from the Payments to validate tab before step 2 becomes possible.
Click Associate the payment. A confirmation toast shows up and the action bar now exposes a solid green Validate button.

« Validate with payment » does not chain into final validation. That button only associates the payment to the enrollment. Step 2 below is what flips the student to Active.
Step 2 — Validate definitively
Click Validate in the action bar. The confirmation modal opens.

The modal reminds that once the enrollment is Active, track, study level and class can no longer be modified:
- Track
- Study level
- Class
A free-form note can be added — it stays visible in the enrollment history.
Super-administrator exception. The modal message is universal, but in practice the super-administrator keeps the ability to edit those three fields from the Edit form even after activation (see the profile table below).
Confirm with Validate definitively. Two things happen at once:
- The enrollment status flips to Active.
- The student's user account is activated (credentials sent by email if filled in, otherwise shown in a printable modal).


At this point the student enters class lists: teachers can record attendance and grades, and a report card can be generated.
The student record
Once the enrollment is validated, open the full student record from the Student record button or via Students → Student list.

The blue header shows:
- Identity (full name, class, track, level, current year).
- Badges: system (LMD / BTS), matricule, enrollment status, nationality.
- Counters: Enrollments / Attendance / Absences / Paid (FCFA).
- Actions: Edit / Documents (dropdown) / Back / Delete (visible only with the
delete_studentspermission, typically super-administrator).
Why the record can look empty even when validated. Right at the start of the year, the Academic / Attendance / Finances tabs are empty because nothing has happened yet: no grades entered, no class held, possibly no follow-up payment. That is normal — the record fills in over time.
Six tabs organise the rest.
Overview
Four key KPIs (average grade, attendance rate, ECTS credits, % settled payments), then a Quick info card and the year-by-year list of enrollments.

When the enrollment has not been finally validated yet, a yellow callout reminds the action and offers a Validate enrollment shortcut button (subject to a validated payment existing).
Academic
Yearly summary: overall average, ranking, mention, and grades by subject as soon as they are entered.

Attendance
Overall attendance rate and the absence / lateness history (filled by the Attendance module).
Finances
Detailed financial KPIs (Total expected / Total paid / Remaining balance) with a progress bar, followed by the Detail by fee row by row (each row with a Pay button scoped to its category).
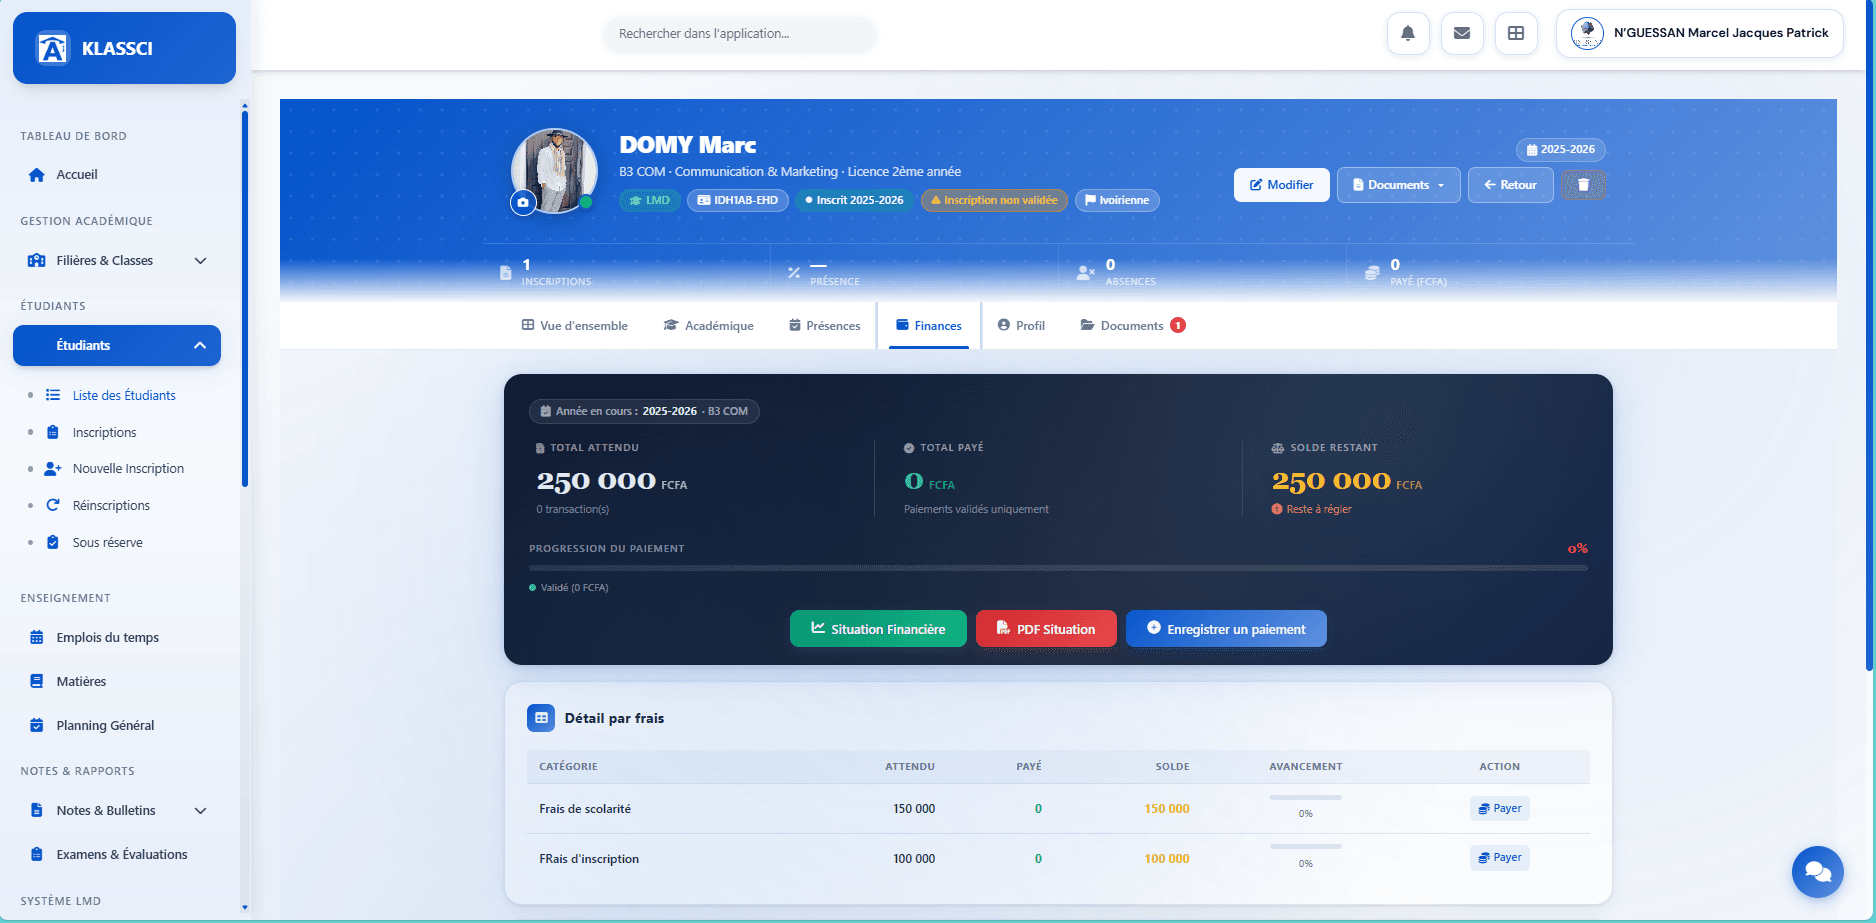
Three action buttons sit under the progress bar:
-
Financial Situation (green) — opens a full web page (not a toast) that lays out the complete statement: hero KPIs, student information, subscribed fees breakdown, validated payments, carried-over balances and remaining due. On-screen view, ready to print or share via the Print button.
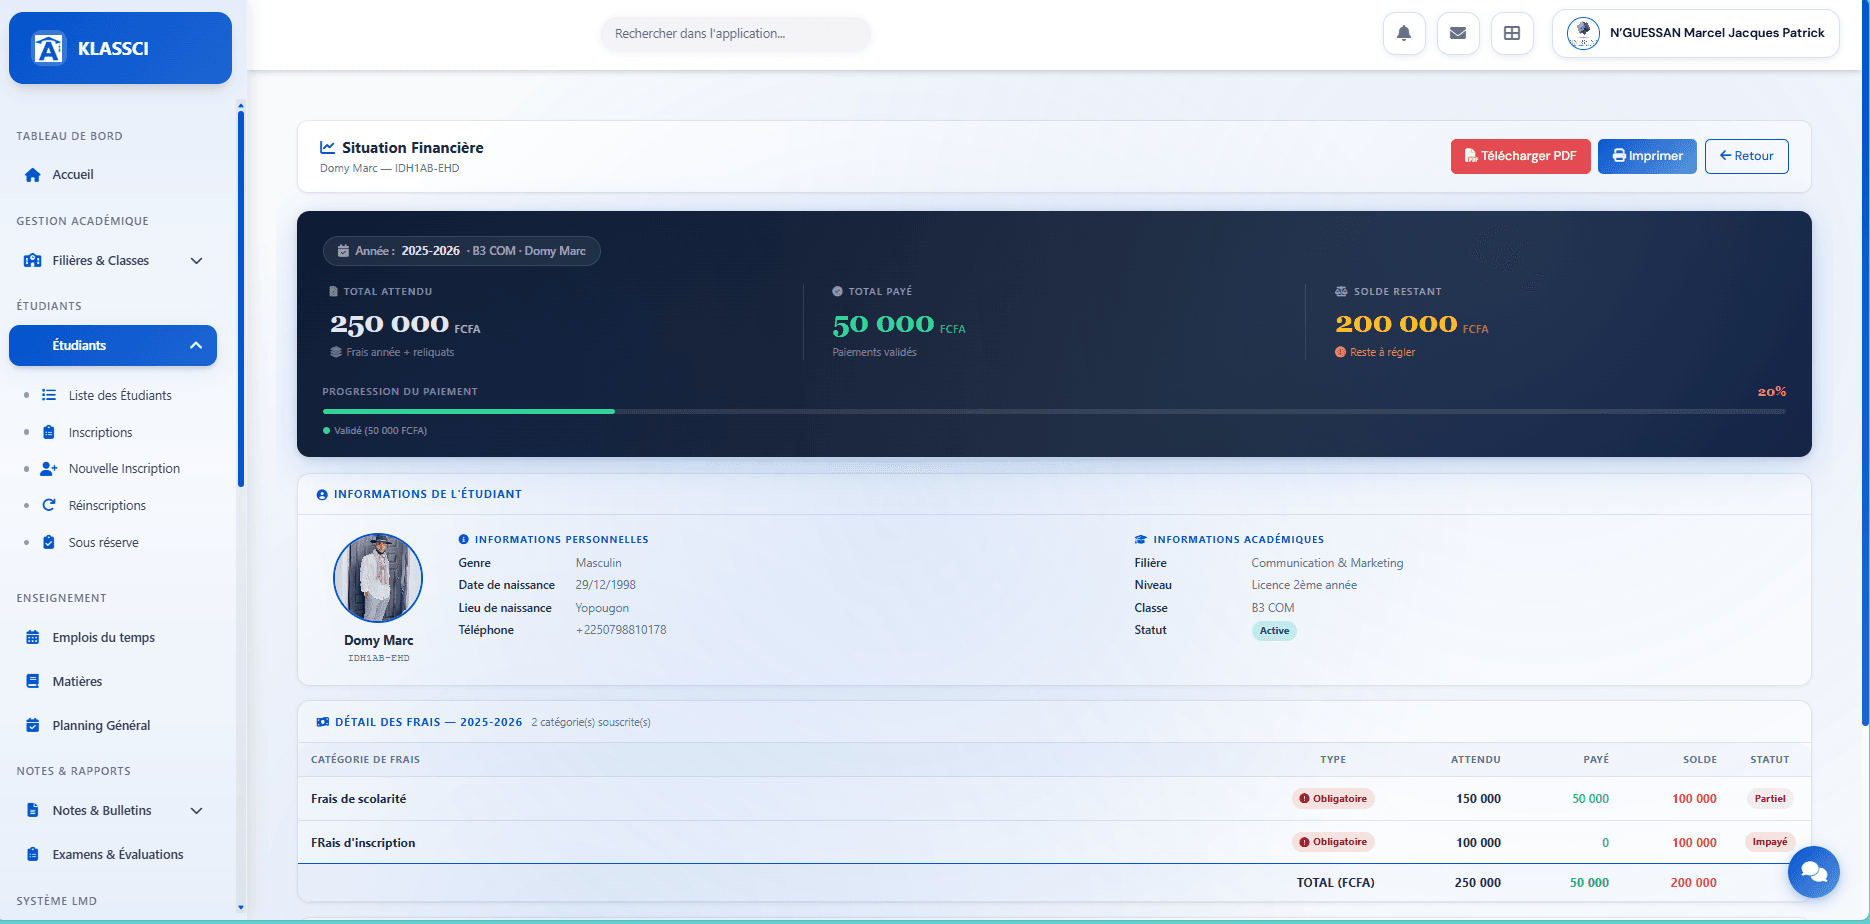
-
PDF Statement (red) — downloads the same situation as a portrait A4 PDF, with a formal layout (school header, issue dates, director signature, watermark), to hand over to the family.
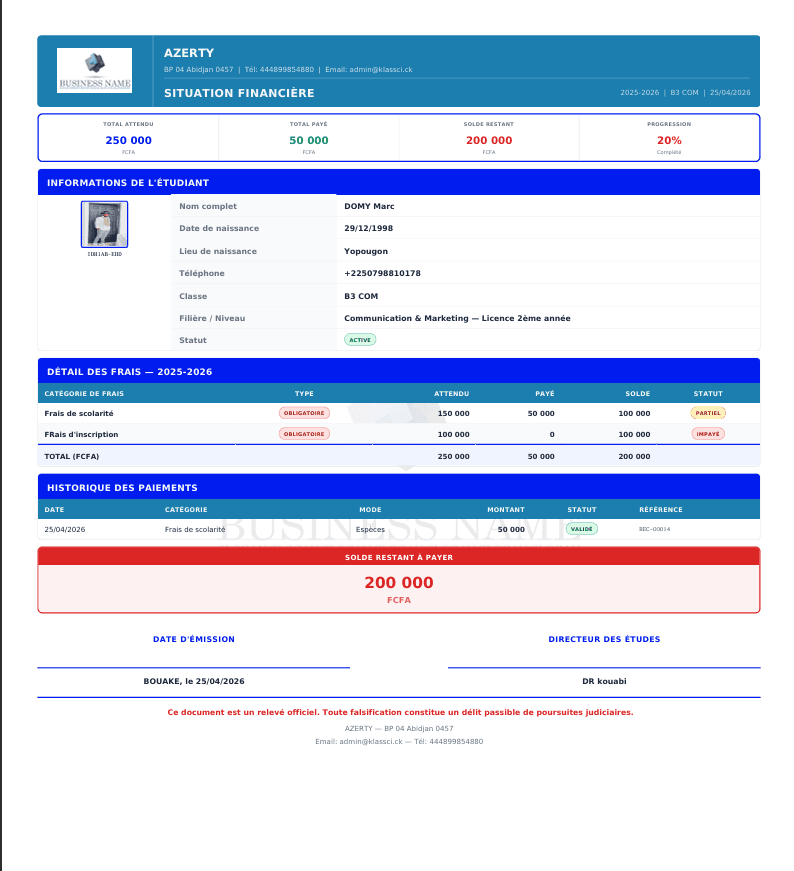
-
Record a payment (blue) — visible only when a balance is still due. Opens the new-payment modal directly from the student record, with no need to go back to the enrollment record.
None of these buttons changes anything on the student side. Financial Situation and PDF Statement are read-only restitutions — useful to answer a statement request without recording a new line. To modify or void an existing payment, go through the Accounting module.
Profile
Full personal information and a User account zone: username, login email, last login, account creation date, and a Reset password button.

Reset password — actual behaviour
Click Reset password in the User account zone. A confirmation dialog opens and previews the default password that will be applied.

Observed format: Bonjour@YYYY where YYYY is the calendar year at the time of the reset (for example Bonjour@2025 if you reset in 2025, Bonjour@2026 if in 2026 — the format follows the server clock, not the academic year).
Confirm with OK. A green toast confirms: « Password reset to Bonjour@YYYY successfully. The student will have to change their password at first login. »

No email is sent. The default password is shown on screen only, first in the confirmation dialog and then in the toast. Hand it over to the student verbally or through a secure channel. Since the format is predictable, do not leave an account sitting on this default — at first login, KLASSCI forces the change.
Documents
File attachments on the file (received certificates, ID copies, admission folders). The red badge on the tab signals newly added documents.

Add a document lets you attach any file to the record.
Issuing a proof of enrollment or attendance certificate
Two official documents are available as soon as an enrollment is validated. Click the Documents button in the student record header.

| Document | When to issue |
|---|---|
| Proof of enrollment | Official paperwork (bank, embassy, transport pass, visa file) — confirms the student is enrolled for the current year |
| Attendance certificate | Justify past actual presence (employer, family allowance, internship) — covers a previous period |
For each document: Preview opens the PDF in a new tab, Download PDF saves it directly.
Custom document. For anything else attached to the file (scanned birth certificate, ID copy, scholarship justification, recommendation letter), go through the student record's Documents tab and click Add a document. The file is bound to the student, not to a specific enrollment — it stays accessible across years.
Edit or transfer a student
Depending on your profile and the cycle stage, several paths let you modify enrollment data or move a student to another class.
Edit the enrollment
Edit button on the enrollment record's action bar, or from the enrollments list.

The form mirrors the creation sections (enrollment information, transfer from another school, MESRS status, tuition amount, observations). The Class field shows beneath: « You can change the class while the enrollment is not yet activated. »
What is editable per profile:
| Profile | Before activation | After activation |
|---|---|---|
| Super-administrator | Everything (including track, level, class) | Everything (including track, level, class) |
| Registrar / Accountant / Coordinator | Everything | Everything except track, level and class |
The Save changes button commits. If the class was changed, KLASSCI recomputes the applicable fees according to the new triplet (class, level, MESRS status) and the enrollment stays at its current step (Prospect or Active).
Transfer a student via the class detail page
For profiles with no permission to edit track/level/class via the form after activation, or to handle bulk transfers, go through the destination (or source) class detail page.
Access: sidebar Tracks & Classes → Classes, then click the class card.

The detail page opens with a blue header (KPIs: Enrolled, Capacity, Subjects, Completion rate, Teachers), a General information zone, and three tabs — Students, Subjects, Hours tracking.

The Students tab lists the current year's enrolled students.

Three buttons to the right of the list:

Add a student to this class
Add button. A modal searches for students already enrolled elsewhere (other class or unassigned).

Type a few characters: KLASSCI searches among students enrolled for the current year but not (yet) in this class. Results show their current class. Tick several students at once.

Click Add X student(s). Each one is transferred from their current class to this one, the enrollment is updated and fees recomputed.
Remove or transfer students from this class
Remove / Transfer button. A modal opens with the class roster.

Pick a Destination class:
- Unassigned (remove without transferring) — pulls the student out of the current class. They become « unassigned » and can be added elsewhere later.
- Another class — direct transfer.
Tick the students to move. The Remove / Transfer X button activates.

Confirm. The selected students leave the current class; those with a destination switch enrollment, the others become unassigned.
Export the student list
Export button opens a dropdown.

| Format | Roll-call list | Full list |
|---|---|---|
| Preview | ||
| Excel | — |
The roll-call list is the lightweight format (matricule + name) for in-class attendance. The full list includes every column (contact, date of birth, MESRS status, etc.) — the Excel export is meant for downstream processing.
Permissions needed for Add and Remove / Transfer. The profile must hold the school administration right (super-administrator, academic coordinator, or school direction). Narrower roles do not see those buttons.
Enrollment Administration page
Central view for managing pending enrollments. Reached from the Administration button on the enrollment record.
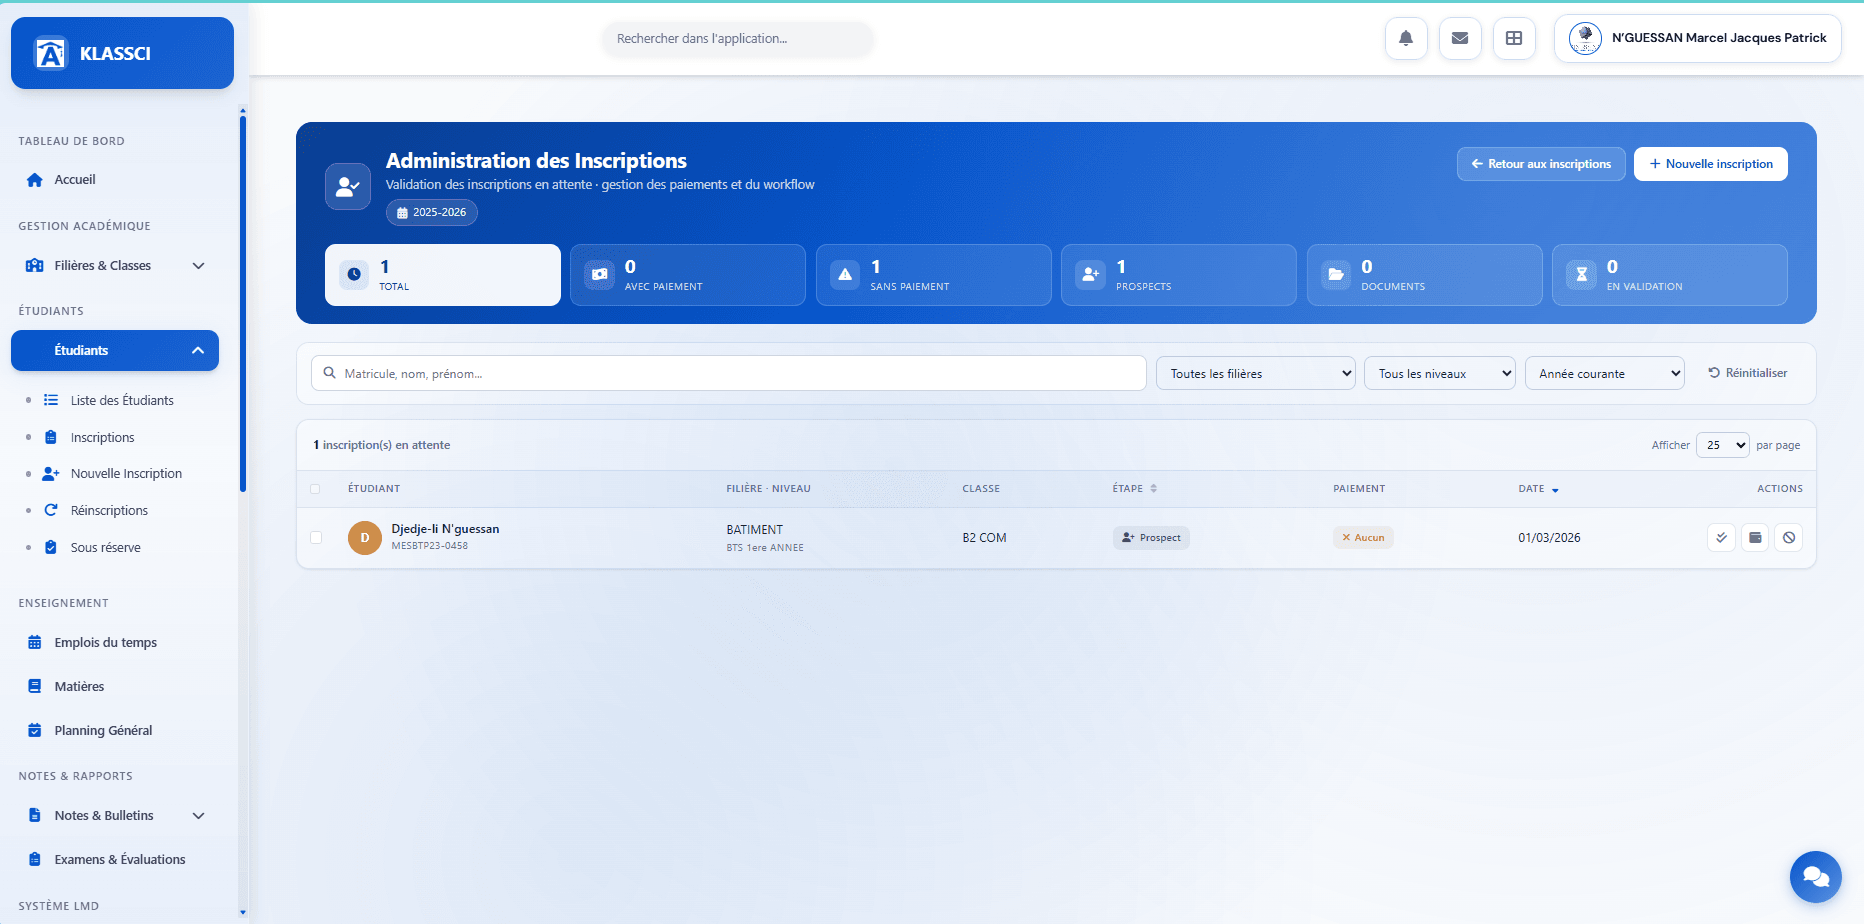
Six KPIs at the top, scoped to the active academic year:
- Total — every pending enrollment
- With payment — already linked to a payment
- No payment — no payment associated yet
- Prospects — Prospect step
- Documents — Documents-complete step
- In review — In-validation step
Filters: matricule / surname / given name, all tracks, all levels, current year. Reset brings everything back to defaults.
List: student, track-level, class, step, payment status, enrollment date, actions.
Per-row actions:
- View the enrollment
- Validate the enrollment (shortcut without going back to the record)
- Associate or validate a payment
- Cancel the enrollment
Bulk actions (tick several rows): Validate, Cancel, Export. The bulk validate attempts each enrollment; the ones without a payment and the ones whose payment is still pending validation are skipped — both cases show up in the recap with their reason.
This is the single most useful page at the start of the year: you see at a glance what is left to finalise, and you can pick enrollments by state to batch-process them.
Edge cases
Re-enrollment for the next year
Do not create a brand-new enrollment for an existing student. Use Students → Re-enrollments: the form starts from the existing student record, the matricule is preserved, and only the new academic year's data (class, MESRS status, fees, initial payment) needs to be entered. Re-enrollment also handles the previous year's outstanding balances — you can carry them over to the new enrollment or write them off depending on your tenant settings. The new enrollment is created at the Documents complete step with Active status (no return to Prospect).
« Conditional » enrollment
If the file is incomplete (missing document, study fee not yet paid), save the enrollment without validating and place it under Conditional (dedicated sidebar entry under Students). It will leave that list when validated definitively.
Scholarship student or deferred payment
Final validation always requires at least one validated payment — no exception, and there is no « Bourse » payment method in the combo. For a scholarship student or someone paying at term start, two practical paths:
- Wait for the actual transfer: leave the enrollment in Prospect until the payment lands, then run the regular flow (step 1 + step 2).
- Record the expected payment up front: if your school materialises the scholarship as an actual payment (cash advance, State transfer received early), record the payment with Method = Cash (for a physical receipt) or Method = Bank transfer (for a wire), with the Reference describing it (« MESRS scholarship period X »). Tick « Validate the payment immediately ». The enrollment becomes validable.
Cancellation before validation
From the Enrollment Administration page (link above), Cancel action on the enrollment row. Effects:
- The enrollment moves to status = cancelled; the reason and cancellation date are recorded in the observations.
- No fee is billed.
- The file stays in the database (no physical delete) but leaves listings filtered on status = active.
- The matricule stays bound to the student — it is not released, on purpose, to keep history coherent.
- If the cancelled enrollment is the only active enrollment of the student, their user account is automatically deactivated (
etudiant.statut='inactif',user.is_active=false).
Cancellation after validation
Same method (annulerInscription) — no specific gating depending on whether the enrollment is Prospect or Active. The history is kept: status cancelled + recorded observations, payments already collected stay in the database with their original status (refunds are your call). The student account is deactivated only when no other active enrollment remains. A physical delete of the enrollment row goes through a separate route protected by a higher permission.
Optional fees subscribed after validation
Available at any time from the enrollment record, Available Optional Fees zone: click Subscribe student on the fee card. The amount is added to the remaining balance.
No subscription from the student record's Finances tab. That tab only exposes Financial Situation, PDF Statement and Record a payment — to subscribe a new optional fee, you have to go through the enrollment record.
At a glance
See also: Fees & accounting · Bursar — daily operations · Super-administrator — initial setup